 MySQL: Using MySQL with PHP
This documentation is part of the Getting started guide. You can view the complete guide here: How to get started with MySQL.
👋 Welcome to the Stackhero documentation!
Stackhero offers a fully managed MySQL cloud service that streamlines deployment and management for your production workloads:
- Unlimited connections and data transfers.
- Integrated phpMyAdmin web interface for simplified database management.
- Effortless updates with one-click upgrades.
- Consistent performance and enhanced security on a private, dedicated infrastructure.
With Stackhero, you have a reliable MySQL database ready within minutes. Reduce the time spent on installation and maintenance, and focus on developing your applications. Try MySQL cloud hosting on Stackhero today.
MySQLi (object-oriented style)
Here is an example of connecting to MySQL in PHP using the MySQLi extension in object-oriented style:
<?php

$hostname = '<XXXXXX>.stackhero-network.com';
$port = '<PORT>';
$user = 'root';
$password = '<ROOT_PASSWORD>';
$database = 'root'; // While this example uses the "root" database, it is recommended to create a dedicated database and user for your application via phpMyAdmin.

$mysqli = mysqli_init();
$mysqliConnected = $mysqli->real_connect($hostname, $user, $password, $database, $port, NULL, MYSQLI_CLIENT_SSL);
if (!$mysqliConnected) {
  die("Connection error: " . $mysqli->connect_error);
}

echo 'Connection successful... ' . $mysqli->host_info . "\n";

$mysqli->close();

?>
MySQLi (procedural style)
If you prefer procedural code, here is how you can connect using MySQLi in procedural style:
<?php

$hostname = '<XXXXXX>.stackhero-network.com';
$port = '<PORT>';
$user = 'root';
$password = '<ROOT_PASSWORD>';
$database = 'root'; // For optimal security, create a dedicated database and user in phpMyAdmin instead of using "root".

$mysqli = mysqli_init();
$mysqliConnected = mysqli_real_connect($mysqli, $hostname, $user, $password, $database, $port, NULL, MYSQLI_CLIENT_SSL);
if (!$mysqliConnected) {
  die("Connection error: " . mysqli_connect_error($mysqli));
}

echo 'Success: ' . mysqli_get_host_info($mysqli) . "\n";

mysqli_close($mysqli);

?>
PDO
If you prefer to use PDO for database access, here is a sample connection setup:
<?php

$hostname = '<XXXXXX>.stackhero-network.com';
$port = '<PORT>';
$user = 'root';
$password = '<ROOT_PASSWORD>';
$database = 'root'; // It is best to create a dedicated database and user for your application.

$dsn = "mysql:host=$hostname;port=$port;dbname=$database";

$options = array(
  // If you encounter SSL-related errors when connecting, make sure your system has the correct CA certificates installed (see below).
  PDO::MYSQL_ATTR_SSL_CAPATH => '/etc/ssl/certs/',
  // PDO::MYSQL_ATTR_SSL_CA => 'isrgrootx1.pem',
  PDO::MYSQL_ATTR_SSL_VERIFY_SERVER_CERT => true,
);

$pdo = new PDO($dsn, $user, $password, $options);

$stm = $pdo->query("SELECT VERSION()");
$version = $stm->fetch();

echo "You are connected to a database running version " . $version[0] . "\n";

?>
Troubleshooting: SSL operation failed with code 1
If you see an error like this:
Uncaught PDOException: PDO::__construct(): SSL operation failed with code 1. OpenSSL Error messages: error:0A000086:SSL routines::certificate verify failed
This likely means your system does not have CA certificates in /etc/ssl/certs/.
If you have access to the system where your PHP code runs, you can add the certificates as follows:
- On Ubuntu/Debian:
sudo apt-get install ca-certificates - On Alpine Linux:
apk add ca-certificates
If you do not have direct access, you can add the certificate manually:
- Download the certificate: https://letsencrypt.org/certs/isrgrootx1.pem
- Place the
isrgrootx1.pemfile in your PHP project. - Comment out the line
PDO::MYSQL_ATTR_SSL_CAPATH => '/etc/ssl/certs/' - Uncomment the line
PDO::MYSQL_ATTR_SSL_CA => 'isrgrootx1.pem'
Resolving: undefined constant errors with PDO
If you see errors like:
Fatal error: Uncaught Error: Undefined constant PDO::MYSQL_ATTR_SSL_CAPATH
or similar messages, this indicates that PDO was installed without MySQL support.
- On Ubuntu/Debian
You can add the required extension by running:
sudo apt-get install php-mysql
- With Docker
If you are using Docker, ensure MySQL support is included during the build. Add this to your Dockerfile:
RUN docker-php-ext-install pdo pdo_mysql
### Using MySQL with Symfony and Doctrine

If you are working with Symfony and Doctrine, you can configure your connection as follows:

1. Edit your `.env` file and set the `DATABASE_URL` variable:
DATABASE_URL="mysql://<USER>:<PASSWORD>@<XXXXXX>.stackhero-network.com:<PORT>/<DATABASE>"
1. Then, in `config/packages/doctrine.yaml`, set the driver and options:

```yaml
doctrine:
    dbal:
        url: '%env(resolve:DATABASE_URL)%'
        driver: 'pdo_mysql'
        options:
            # PDO::MYSQL_ATTR_SSL_CAPATH
            1010: '/etc/ssl/certs'
            # PDO::MYSQL_ATTR_SSL_VERIFY_SERVER_CERT
            1014: true
Troubleshooting: SSL operation failed with code 1
If you encounter an error like:
Uncaught PDOException: PDO::__construct(): SSL operation failed with code 1. OpenSSL Error messages: error:0A000086:SSL routines::certificate verify failed
This likely means the /etc/ssl/certs/ directory does not contain CA certificates.
If you have access to the system, you can install them as follows:
- On Ubuntu/Debian:
sudo apt-get install ca-certificates - On Alpine Linux:
apk add ca-certificates
If you do not have direct access, you can add the certificate manually:
- Download: https://letsencrypt.org/certs/isrgrootx1.pem
- Place
isrgrootx1.pemin your Symfony project. - Update
config/packages/doctrine.yaml:
doctrine:
    dbal:
        url: '%env(resolve:DATABASE_URL)%'
        driver: 'pdo_mysql'
        options:
            # PDO::MYSQL_ATTR_SSL_CA
            1009: 'isrgrootx1.pem'
            # PDO::MYSQL_ATTR_SSL_VERIFY_SERVER_CERT
            1014: true
Using MySQL with Laravel
To configure MySQL in Laravel, open config/database.php and update the MySQL section:
'mysql' => [
  'driver' => 'mysql',
  'host' => env('STACKHERO_MYSQL_HOST'),
  'port' => env('STACKHERO_MYSQL_PORT'),
  'username' => env('STACKHERO_MYSQL_USER'),
  'password' => env('STACKHERO_MYSQL_PASSWORD'),
  'database' => env('STACKHERO_MYSQL_USER'),
  'charset' => 'utf8mb4',
  'collation' => 'utf8mb4_unicode_ci',
  'prefix' => '',
  'prefix_indexes' => true,
  'strict' => true,
  'engine' => null,
  'sslmode' => 'require',
  'options' => extension_loaded('pdo_mysql')
    ? array_filter([
      // For SSL errors, see troubleshooting above.
      PDO::MYSQL_ATTR_SSL_CAPATH => '/etc/ssl/certs/',
      // PDO::MYSQL_ATTR_SSL_CA => 'isrgrootx1.pem',
      PDO::MYSQL_ATTR_SSL_VERIFY_SERVER_CERT => true,
    ])
    : [],
],
Using MySQL with PHP CodeIgniter
In the database.php configuration file, you can add:
$db['default'] = array(
  'hostname' => getenv('STACKHERO_MYSQL_HOST'),
  'port'     => getenv('STACKHERO_MYSQL_PORT'),
  'username' => getenv('STACKHERO_MYSQL_USER'),
  'password' => getenv('STACKHERO_MYSQL_PASSWORD'),
  'database' => getenv('STACKHERO_MYSQL_USER'), // By convention, the database name matches the user.
  'dbdriver' => 'mysqli',
  'dbprefix' => '',
  'pconnect' => true,
  'char_set' => 'utf8',
  'dbcollat' => 'utf8_general_ci',
  'encrypt'  => array() // Important: enable TLS encryption
);
Connecting with environment variables in PHP
It is generally safer to avoid storing your database credentials in your code. You can use environment variables instead. Here is how to retrieve them:
$hostname = getenv('STACKHERO_MYSQL_HOST');
$port = getenv('STACKHERO_MYSQL_PORT');
$user = getenv('STACKHERO_MYSQL_USER');
$password = getenv('STACKHERO_MYSQL_PASSWORD');
$database = getenv('STACKHERO_MYSQL_USER'); // By convention, the database name matches the user.
Using MySQL with WordPress
Connecting WordPress to Stackhero for MySQL is straightforward. You just need to edit your wp-config.php file as follows:
define('DB_HOST', '<XXXXXX>.stackhero-network.com');
define('DB_PORT', '<PORT>');
define('DB_NAME', 'root');
define('DB_USER', 'root');
define('DB_PASSWORD', '<yourPassword>');

// Enable TLS encryption (also known as SSL)
define('MYSQL_CLIENT_FLAGS', MYSQLI_CLIENT_SSL);
The key step here is to enable TLS (SSL) encryption. Without this, your connection will not work as expected.
Using MySQL with Node.js
MySQL X protocol (xdevapi package)
To use the MySQL X protocol, install the official xdevapi package:
npm install @mysql/xdevapi
Here is an example script:
const mysqlx = require('@mysql/xdevapi');

(async () => {
  // Connect to MySQL using MySQL X Protocol
  const session = await mysqlx.getSession({
    host: '<XXXXXX>.stackhero-network.com',
    port: '<PORT>',
    user: 'root',
    password: '<ROOT_PASSWORD>'
  });

  // Create the schema (database) if it does not exist
  const schemaExists = await session.getSchema('stackherotest').existsInDatabase();
  if (!schemaExists) {
    await session.createSchema('stackherotest');
  }

  // Create the 'users' table if it does not exist
  const tableExists = await session
    .getSchema('stackherotest')
    .getTable('users')
    .existsInDatabase();
  if (!tableExists) {
    await session
      .sql('CREATE TABLE `stackherotest`.`users` '
        + '('
        + '`userId` INT UNSIGNED NOT NULL,'
        + '`name` VARCHAR(128) NOT NULL,'
        + '`address` TEXT NOT NULL,'
        + '`email` VARCHAR(265) NOT NULL'
        + ') '
        + 'ENGINE = InnoDB;')
      .execute();
  }

  // Insert a sample user
  await session
    .getSchema('stackherotest')
    .getTable('users')
    .insert('userId', 'name', 'address', 'email')
    .values(
      Math.round(Math.random() * 100000),
      'User name',
      'User address',
      '[email protected]'
    )
    .execute();

  // Count the number of users
  const usersCount = await session
    .getSchema('stackherotest')
    .getTable('users')
    .count();

  console.log(`There are now ${usersCount} entries in the table "users"`);

  // Close the connection
  await session.close();

})().catch(error => {
  console.error('');
  console.error('An error occurred!');
  console.error(error);
  process.exit(1);
});
MySQL protocol (mysql2 package)
If you prefer the classic protocol, you can use the mysql2 package with promise support. Install it with:
npm install mysql2
Example usage:
const mysql = require('mysql2/promise');

(async () => {
  const db = await mysql.createConnection({
    host: '<XXXXXX>.stackhero-network.com',
    port: '<PORT>',
    user: 'root',
    password: '<ROOT_PASSWORD>'
  });

  // Create the database if needed
  await db.query('CREATE DATABASE IF NOT EXISTS stackherotest');

  // Create the table if needed
  await db.query('CREATE TABLE IF NOT EXISTS `stackherotest`.`users` '
    + '('
    + '`userId` INT UNSIGNED NOT NULL,'
    + '`name` VARCHAR(128) NOT NULL,'
    + '`address` TEXT NOT NULL,'
    + '`email` VARCHAR(265) NOT NULL'
    + ') '
    + 'ENGINE = InnoDB;');

  // Insert a sample user
  await db.query(
    'INSERT INTO `stackherotest`.`users` (`userId`, `name`, `address`, `email`) VALUES ?',
    [
      [
        Math.round(Math.random() * 100000),
        'User name',
        'User address',
        '[email protected]'
      ]
    ]
  );

  // Count users
  const [ usersCount ] = await db.query('SELECT COUNT(*) AS `cpt` FROM `stackherotest`.`users`');
  console.log(`There are now ${usersCount[0].cpt} entries in the table "users"`);

  // Close the connection
  await db.end();

})().catch(error => {
  console.error('');
  console.error('An error occurred!');
  console.error(error);
  process.exit(1);
});
Using MySQL with Node.js, NestJS, or TypeORM
To connect from Node.js, NestJS, or TypeORM, you can add the ssl option as shown below:
TypeOrmModule.forRoot({
  type: 'mysql',
  host: '<XXXXXX>.stackhero-network.com',
  port: <PORT>,
  username: 'root',
  password: '<ROOT_PASSWORD>',
  database: 'root',
  entities: [],
  synchronize: true,
  ssl: {}
});
Using MySQL with Prisma
If you are using Prisma, adding the sslaccept=strict option ensures an encrypted connection. Here is an example configuration:
datasource db {
  provider = "mysql"
  url = "mysql://root:<ROOT_PASSWORD>@<XXXXXX>.stackhero-network.com:<PORT>/root?sslaccept=strict"
}
Using MySQL with Django
If you have not yet installed the mysqlclient module, you can do so with:
pip install mysqlclient
If you get the
Exception: Can not find valid pkg-config nameerror during installation, you may need to add thelibmysqlclientpackage. On Ubuntu/Debian, use:apt-get update && apt-get install --no-install-recommends -y libmysqlclient-dev
To test the connection, you can initially store the password directly in your settings.py file. For long-term security, it is best to use environment variables (see below).
Edit your settings.py as follows:
DATABASES = {
  'default': {
    'ENGINE': 'django.db.backends.mysql',
    'HOST': '<XXXXXX>.stackhero-network.com',
    'PORT': '<PORT>',
    'OPTIONS': {
      'ssl_mode': 'REQUIRED',
    },
    'NAME': 'root',
    'USER': 'root',
    'PASSWORD': '<ROOT_PASSWORD>'
  }
}
Please note: this example is for testing only and is not recommended for production environments!
After confirming your connection works, you can switch to a more secure approach using django-environ to manage environment variables.
First, install the package:
pip install django-environ
Then, update your settings.py:
import environ
env = environ.Env()
environ.Env.read_env()

DATABASES = {
  'default': {
    'ENGINE': 'django.db.backends.mysql',
    'HOST': env('STACKHERO_MYSQL_HOST'),
    'PORT': env('STACKHERO_MYSQL_PORT'),
    'OPTIONS': {
      'ssl_mode': 'REQUIRED',
    },
    'NAME': 'root',
    'USER': 'root',
    'PASSWORD': env('STACKHERO_MYSQL_ROOT_PASSWORD')
  }
}
Create or edit the .env file in the same directory as settings.py and add:
STACKHERO_MYSQL_HOST=<XXXXXX>.stackhero-network.com
STACKHERO_MYSQL_PORT=<PORT>
STACKHERO_MYSQL_ROOT_PASSWORD=<ROOT_PASSWORD>
Finally, to keep your credentials secure, add .env to your .gitignore file:
echo ".env" >> .gitignore
Connecting MySQL with Java/Spring
To connect your Spring application, set the SPRING_DATASOURCE_URL environment variable with your database URL, making sure to prefix it with jdbc::
SPRING_DATASOURCE_URL=jdbc:mysql://root:<ROOT_PASSWORD>@<XXXXXX>.stackhero-network.com:<PORT>/root?useSSL=true&requireSSL=true
Connecting MySQL with Groovy/Grails
Here is an example of configuring your Grails application to connect to MySQL:
dataSource {
  pooled = true
  driverClassName = "com.mysql.cj.jdbc.Driver"
  dialect = org.hibernate.dialect.MySQL8Dialect
  // SSL-specific properties
  properties {
    useSSL = true
    requireSSL = true
    verifyServerCertificate = true
    sslMode = "REQUIRED"
  }
}

environments {
  production {
    dataSource {
      dbCreate = "none"
      url = "jdbc:mysql://" + System.env.STACKHERO_MYSQL_HOST + ":" + System.env.STACKHERO_MYSQL_PORT + "/root?useSSL=true&requireSSL=true&verifyServerCertificate=true&sslMode=required" // You can replace "/root" with your preferred database.
      username = "root" // It is advisable to create a dedicated user for your application.
      password = System.env.STACKHERO_MYSQL_ROOT_PASSWORD
      properties {
        maxActive = 50
        minEvictableIdleTimeMillis = 1800000
        timeBetweenEvictionRunsMillis = 1800000
        numTestsPerEvictionRun = 3
        testOnBorrow = true
        testWhileIdle = true
        testOnReturn = false
        validationQuery = "SELECT 1"
      }
    }
  }
}
Creating a user on MySQL using phpMyAdmin
For enhanced security, it is recommended to create a dedicated user for your application instead of using the "root" user. You can do this easily with phpMyAdmin:
-
In phpMyAdmin, select
User accountsfrom the main menu.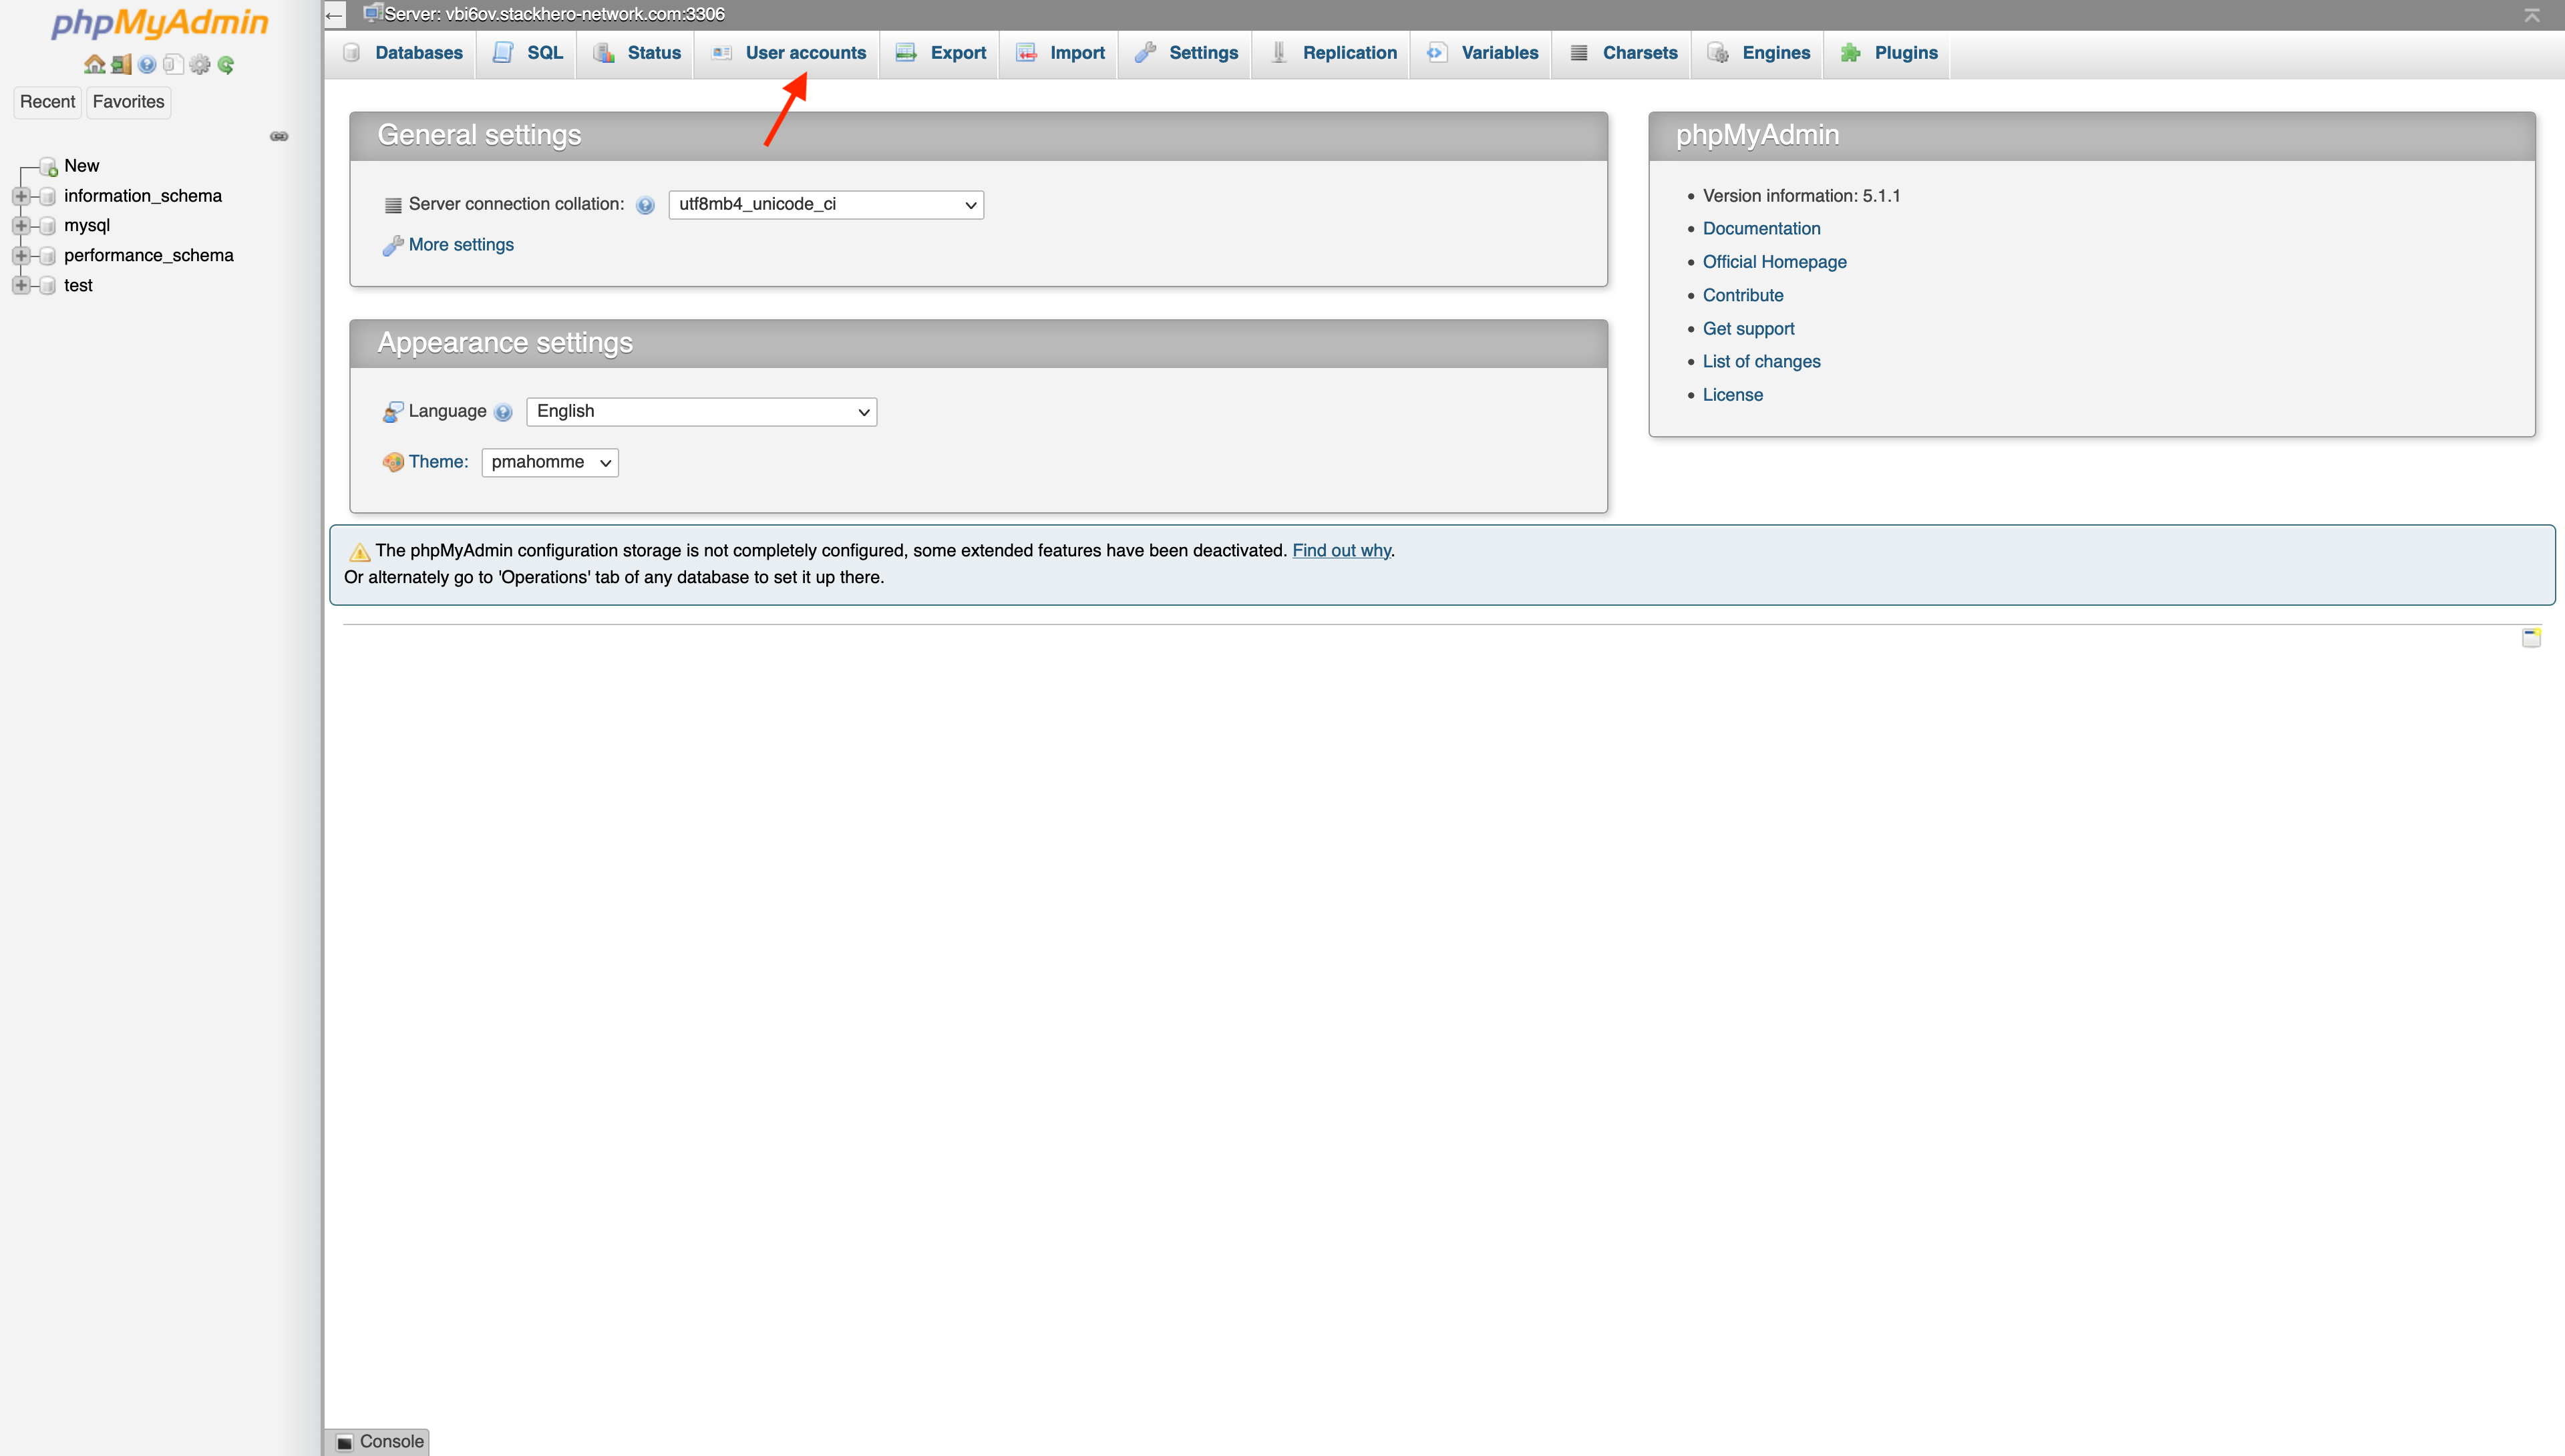
-
Click
Add user account.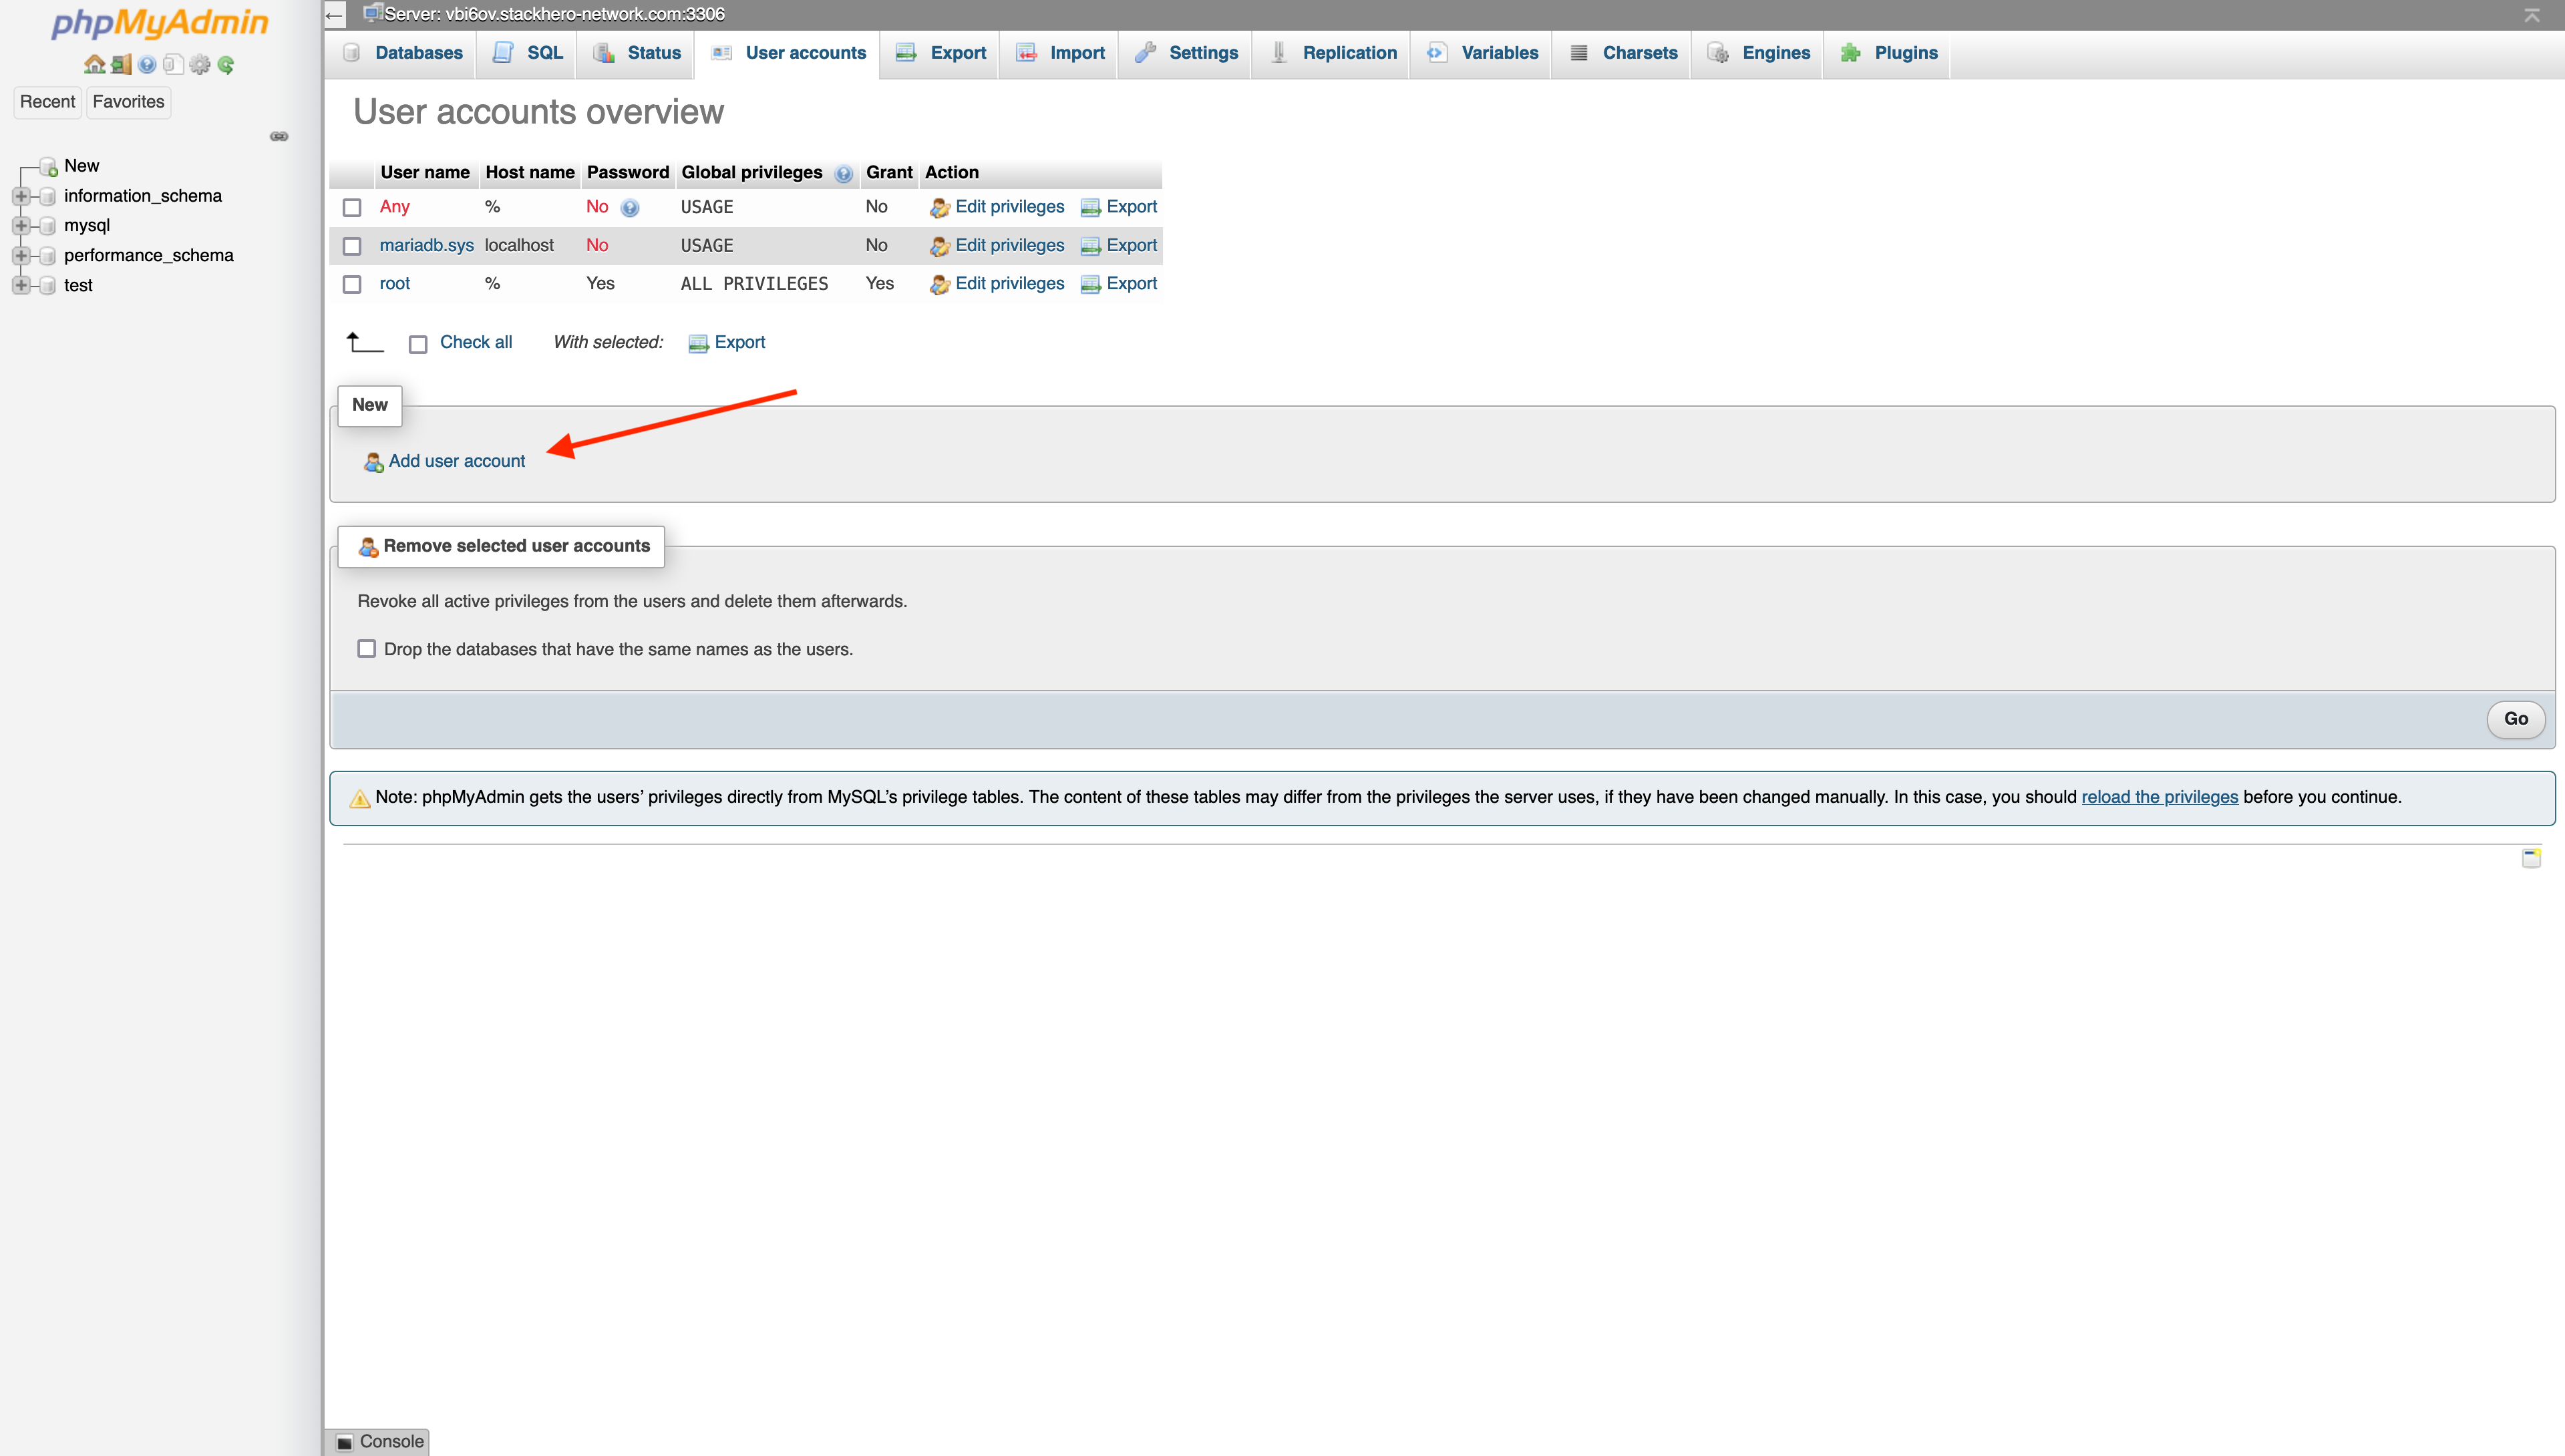
-
Fill out the user creation form:
- Enter an account name (usually your application's name)
- Click
Generate passwordfor a secure password and copy it - Select
Create database with same name and grant all privileges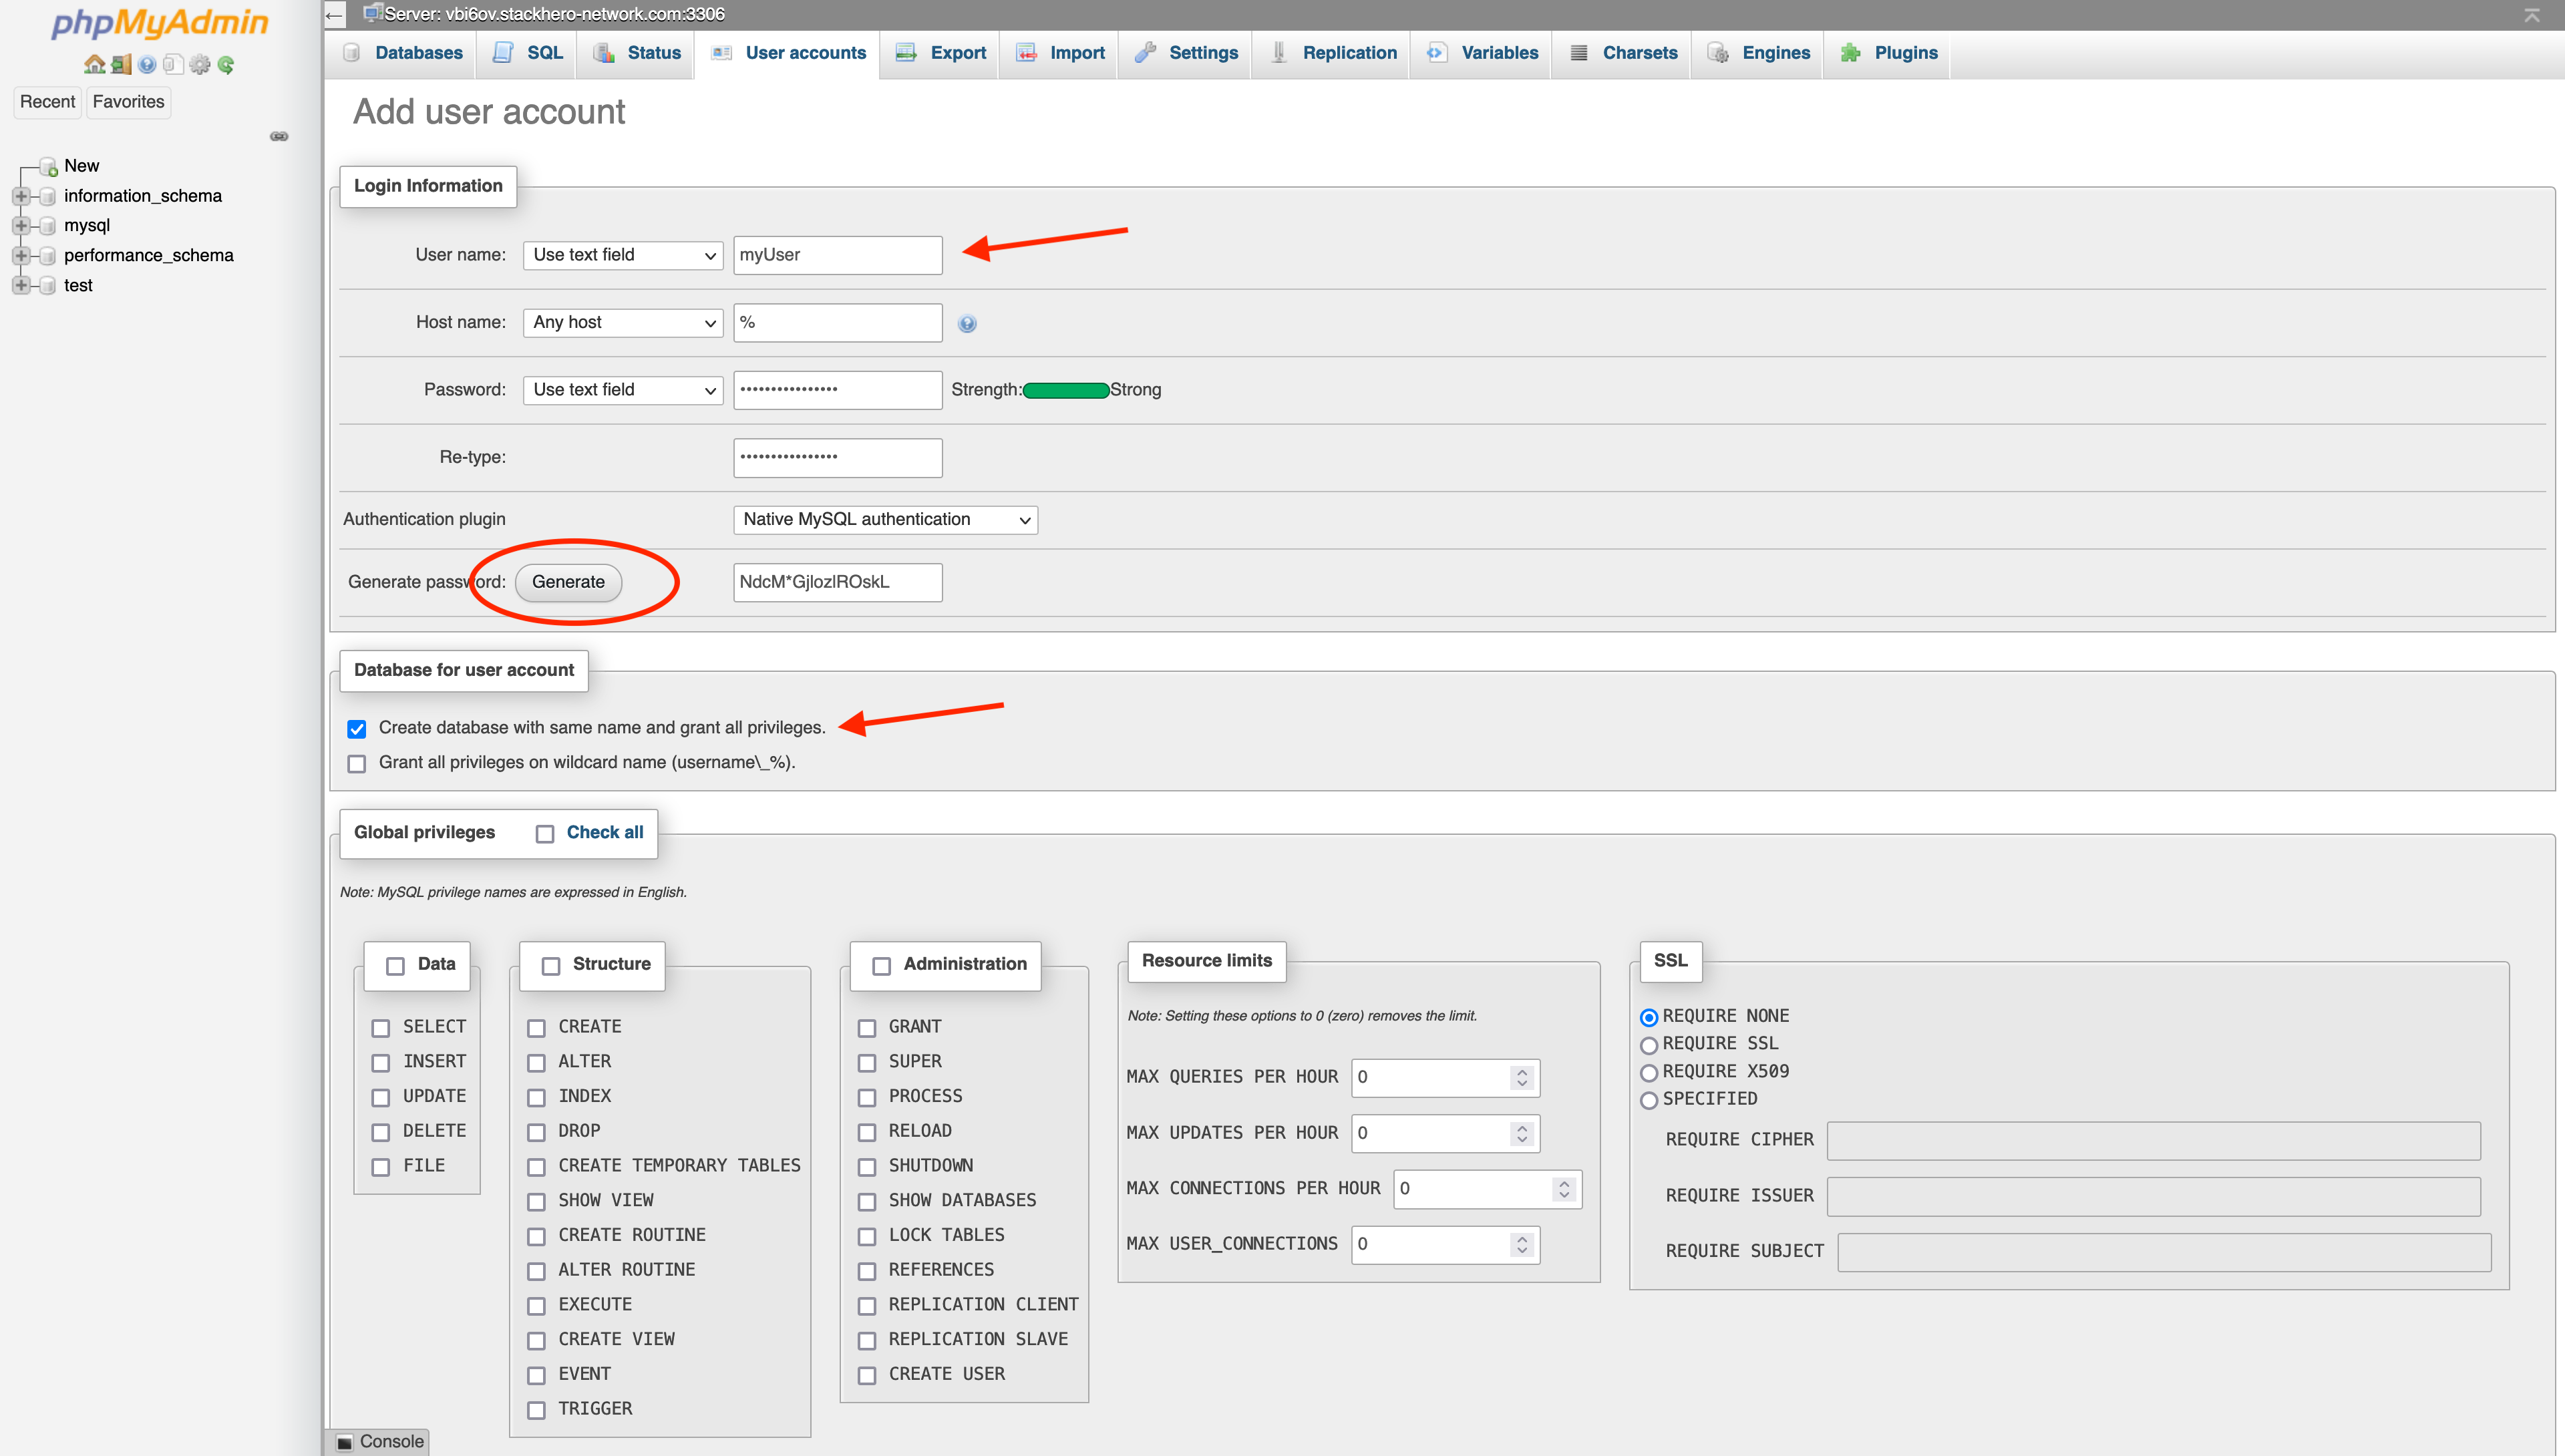
Once you submit the form, you will have a new user and a dedicated database with the same name as your username.